Open the instructions before printing or cutting your first PDF pattern. They tell you which file to use, how to choose a size and which allowances are already included. Keep the download files together in a named folder so you can find the instructions again while sewing.
Choose the file for your setup
- A4 and Letter files are for home printing on the matching paper size.
- A0 files are for large-format printing.
- Projector files let you project the pieces onto a flat cutting surface.
Check which formats come with your particular pattern. If the file offers size layers, show the size or sizes you need while keeping labels and reference markings visible.
Measure the print reference first
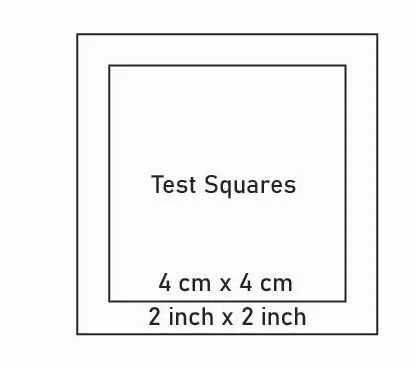
Select Actual size or 100% in the print settings. Print the test-square page before printing the whole pattern, then measure the reference against its own label. Four centimetres and two inches are different dimensions: two inches equal 5.08 cm.
If the reference is wrong, correct the print settings and test again. Do not resize individual pages differently to make their edges meet.
Assemble the home-printed pages
Follow the assembly diagram in your instructions. Match the alignment lines for A4 or Letter as appropriate and check that the pattern outlines continue smoothly across the joins. Keep fold lines, grainlines, notches and mirrored pieces clear when tracing or cutting.
Check a projector on the actual cutting surface
Measure the calibration reference in both directions where the fabric will lie. Recheck after moving the projector or changing the zoom, resolution or placement. Smooth the fabric without stretching it, align its required stretch direction and keep it from shifting while you cut.
Watch the Cherielle projector example
The F4U demonstration shows the projected pattern on a gridded mat, checking the grid, selecting a size and moving on to fabric placement and cutting. Use it alongside the measurements from your own setup.
The later cutting section also shows a high yoga waistband divided to use the available fabric. That extra join needs its own seam allowance on both adjoining edges; edges that already include an allowance do not need another one. Keep the stretch direction consistent when planning the join.
Read the allowances before you sew
F4U patterns include seam allowance, but the amount and hem allowance depend on the pattern and selected option. Read those notes before cutting. Transfer the required markings and keep the instructions beside your project.
Prepare the size and fabric
Use the body-measuring guide to choose a size, the fabric guide to compare materials and the stretch and recovery guide when the pattern calls for knit fabric.